Did you know that up to 40% of your home’s heated or cooled air could be escaping through leaky ducts? This not only wastes energy but also increases your utility bills, strains your HVAC system, and compromises indoor comfort. Sealing your air ducts can solve these issues by reducing energy loss, lowering costs, and improving airflow.
Key Takeaways:
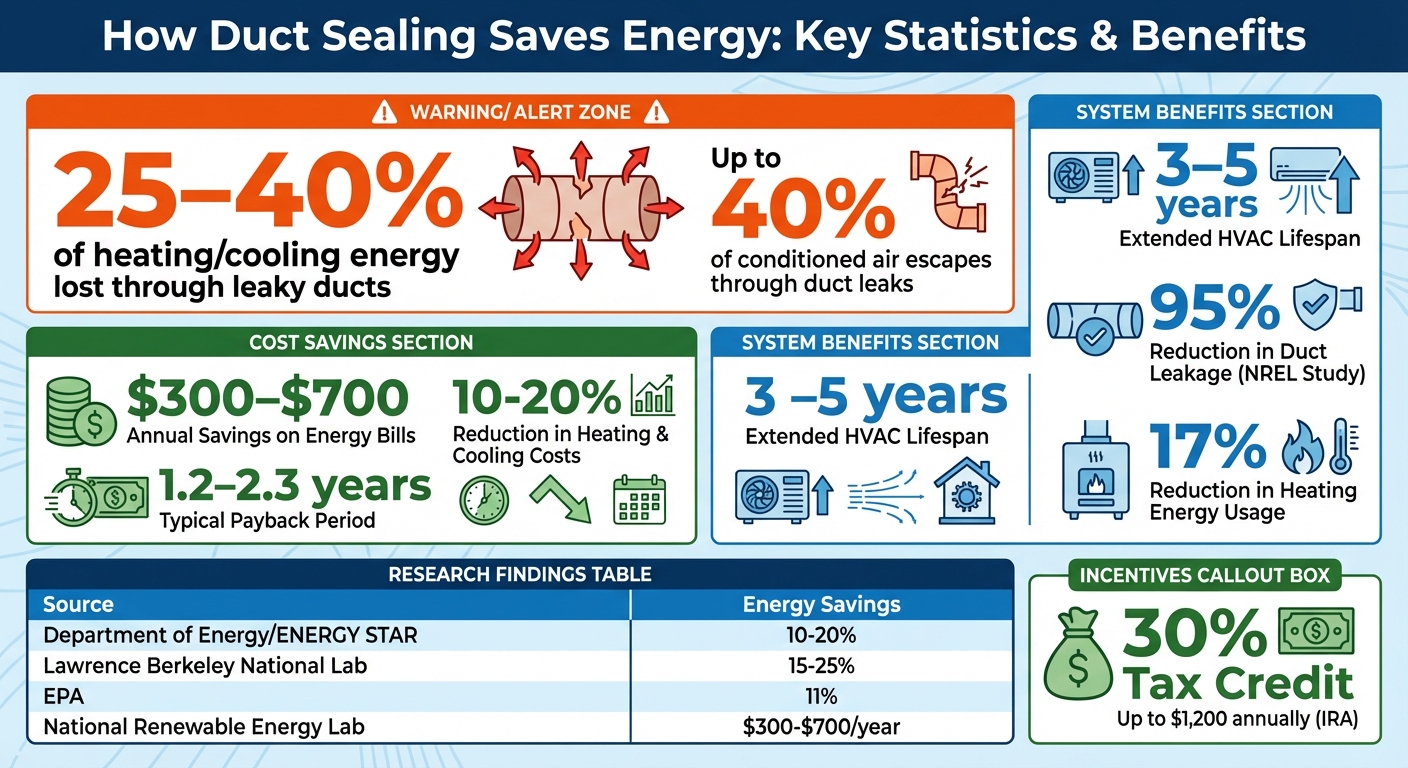
- Energy Savings: Properly sealed ducts can cut heating and cooling costs by 10–20%.
- Cost Impact: Homeowners can save $300–$700 annually on energy bills.
- HVAC Benefits: Reduces strain on your system, extending its lifespan by 3–5 years. Regular annual maintenance ensures these efficiency gains last.
- Air Quality: Prevents pollutants like dust and allergens from entering your home.
Sealing ducts is a cost-effective way to improve your home’s efficiency. Whether you DIY or hire a professional, the investment typically pays for itself within 3–5 years through reduced energy bills. Plus, federal tax credits and rebates can make the process even more affordable. Keep reading to learn how to locate leaks, seal them effectively, and maximize your savings.
How Duct Sealing Saves Energy and Money: Key Statistics
How to Spot and Seal Leaky Ducts: The Hidden Energy Expense in Your Home
sbb-itb-8db64ac
How Duct Sealing Reduces Energy Waste
Leaky ductwork turns your HVAC system from a closed-loop system into an inefficient, open one. Instead of circulating air efficiently, conditioned air escapes into areas like attics, crawl spaces, and garages. At the same time, leaky return ducts pull in unconditioned air, making your system work overtime to maintain temperature.
This dual issue places unnecessary strain on your HVAC equipment. In fact, typical duct systems can lose anywhere from 25% to 40% of the heating or cooling energy they produce. Even a relatively small 20% leak can force your system to work 50% harder than it should. This extra workload not only wastes energy but also wears down your system faster, as explained below.
How Leaky Ducts Strain HVAC Systems
The mechanical stress caused by duct leaks underscores the importance of sealing them. Beyond just losing air, leaks disrupt system pressure, leading to weak airflow at your vents. To compensate, the blower motor runs longer cycles to push air through the system. The HVAC unit, responding to the thermostat’s unmet demands, is unaware of the escaping air.
"Think of your ducts like the arteries of your HVAC system – if they’re leaky, nothing else works quite right." – Mike Sanders, The Furnace Outlet
This constant cycling wears out key components like the compressor and blower motor more quickly. Equipment designed to last 15–20 years may require replacement much sooner. Additionally, leaky ducts can draw in dust, mold spores, and allergens from unconditioned spaces, leading to poorer indoor air quality. These inefficiencies directly contribute to higher energy bills.
Energy Loss Numbers and Monthly Costs
The financial impact of duct leaks is clear when you look at your utility bill. Studies reveal how much energy – and money – you can save by sealing your ducts:
| Study Source | Estimated Annual Energy Savings from Sealing |
|---|---|
| Department of Energy / ENERGY STAR | 10%–20% of total energy costs |
| Lawrence Berkeley National Laboratory | 15%–25% of energy costs |
| Environmental Protection Agency (EPA) | 11% of total energy costs |
| National Renewable Energy Laboratory | $300–$700 per year |
For the average homeowner, these leaks can add $300–$700 to annual energy expenses. By sealing your ducts, you could cut cooling costs by up to 20%, with the investment typically paying for itself within three to five years through reduced utility bills.
Benefits of Sealing Your Air Ducts
Fixing duct leaks doesn’t just cut down on wasted energy – it comes with a range of perks that improve your home’s comfort, efficiency, and even air quality.
Lower Energy Bills
Sealing your air ducts can lead to noticeable savings on your energy bills. When your HVAC system doesn’t have to work overtime to make up for lost air, it uses less energy. Homeowners typically see savings of 10%–30% on heating and cooling costs. With annual savings ranging from $300 to $700, the investment of $500–$1,500 for duct sealing often pays for itself within two to three years. Plus, with better airflow and temperature control, your home becomes more comfortable as a result.
Better Temperature Control and Airflow
Sealed ducts ensure that conditioned air reaches every corner of your home, leading to more consistent temperatures from room to room. This means no more hot or cold spots. Additionally, your HVAC system can manage humidity levels more effectively, improving overall comfort. Sealing also prevents drafts caused by unconditioned air sneaking into return ducts, making your home feel cozier.
Longer HVAC System Life
Reducing the strain on your HVAC system can significantly extend its lifespan. By working more efficiently, components like the compressor and blower motor experience less wear and tear.
"Many homeowners find that their HVAC systems last 3-5 years longer after proper duct sealing." – Advanced Plumbing, Heating, and Air
This not only delays the need for costly replacements but may also give you the opportunity to downsize to a smaller, more efficient system when it’s time for an upgrade.
Cleaner Indoor Air
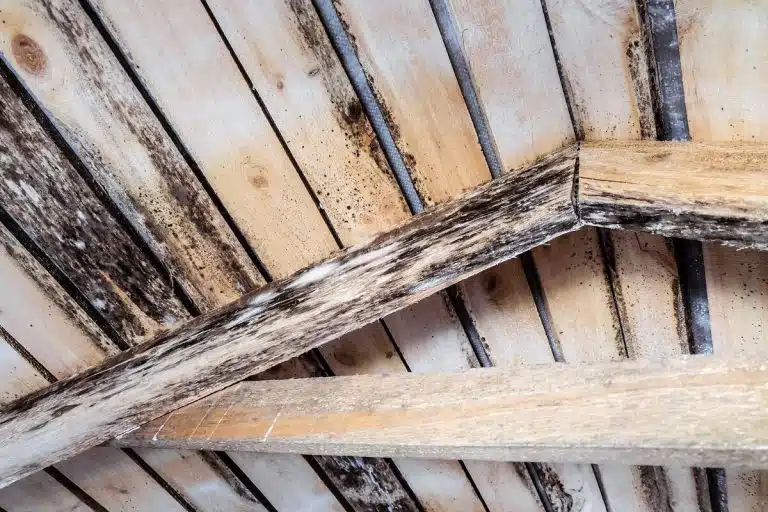
Sealing your ducts helps keep pollutants like dust, pollen, and mold spores from entering your home. Leaky return ducts often pull in contaminants from unconditioned areas such as attics or crawl spaces, which can worsen allergies or respiratory issues. Proper sealing also reduces the risk of backdrafting harmful combustion gases like carbon monoxide into your living spaces. On top of that, it eliminates those frustrating whistling or rattling noises caused by escaping air.
How to Seal Air Ducts: Step-by-Step
After discussing how leaky ducts waste energy, let’s dive into a straightforward guide to sealing them. This process involves gathering the right tools, identifying leaks, sealing them effectively, and ensuring your work is solid.
Tools and Materials You’ll Need
Here’s what you’ll need: duct mastic, UL 181-rated foil tape, fiberglass mesh tape (for gaps larger than ¼ inch), a paintbrush or putty knife, a utility knife, cleaning rags with a mild cleaning solution, and protective gear like heavy gloves, safety goggles, an N95 mask, and long sleeves. To help you locate leaks, grab a smoke pencil, an incense stick, or a single ply of tissue paper. If your ducts run through unconditioned spaces like attics or crawl spaces, you may also want insulation installation services to wrap them.
One important tip: don’t use standard cloth-backed duct tape. Despite its name, it doesn’t hold up under HVAC temperature changes and dries out quickly. The U.S. Department of Energy recommends:
"Mastic is the preferred material for sealing ductwork seams and joints. It is more durable than any available tape and generally easier for a do-it-yourself installation".
DIY sealing materials typically cost between $55 and $170 – much more affordable than the $1,000 to $2,500 range for professional sealing. Once you’ve gathered your materials, it’s time to find the leaks.
Finding Duct Leaks
Start by inspecting exposed ductwork in areas like attics, basements, or crawl spaces. Look for visible holes, disconnected sections, or flattened flexible ducts. With the HVAC system running, carefully feel along the seams and joints for escaping air. Listen for sounds like whistling, rattling, or whooshing, which can signal leaks. Dust buildup around vents or dark streaks on insulation are also common signs of air leaks.
To pinpoint leaks, use a smoke pencil or incense stick near seams. If the smoke wavers or a tissue flutters, you’ve found a leak. Pay close attention to high-pressure spots such as the plenum (the box connecting ducts to the furnace), elbows, turns, and areas where smaller branch ducts split from the main trunk.
Sealing the Gaps
Before sealing, clean the area with a damp rag and mild cleaner. For small leaks, apply mastic with a brush or putty knife. For gaps larger than ¼ inch, reinforce first with fiberglass mesh tape, then cover it completely with mastic. Use UL 181-rated foil tape for long, straight seams. Seal duct boots with silicone caulk or extra mastic, and wrap any exposed ducts in unconditioned spaces with fiberglass insulation blankets. Once sealed, avoid running the HVAC system for 24–48 hours to let the mastic cure. After that, it’s time to test your work.
Testing Your Work
To check your sealing job, use a smoke pencil or tissue paper around the sealed areas. If the smoke or tissue stays steady, the seal is good; if not, reapply mastic or tape where needed. For a more thorough check, professionals often use tools like duct blasters or infrared cameras to locate hidden leaks. Additionally, if your home has fuel-burning appliances, it’s a good idea to install a carbon monoxide monitor after sealing. Adjusting air pressure can sometimes cause exhaust gases to backdraft, so this extra step is a smart precaution.
Getting the Most from Duct Sealing
Calculating Your Energy Savings
Sealing your ducts can cut your monthly energy bills by 10–20%, translating to yearly savings of $300–$600. With these savings, you could see a payback period of just 1.2 to 2.3 years.
Here’s an example: In 2014, the National Renewable Energy Laboratory (NREL) worked with the Raleigh Housing Authority in North Carolina to seal ducts in 50 single-family homes. These homes initially had a duct leakage rate of 31%. After sealing, the leakage dropped to 1.4% – a massive 95% improvement. This project resulted in an average 17% reduction in heating energy usage, with a similar payback period of 1.2 to 2.3 years based on a $700 installation cost. And don’t forget – rebates and incentives can make these upgrades even more affordable.
Using Rebates and Incentives
The Inflation Reduction Act (IRA) offers a 30% tax credit – up to $1,200 annually – for duct sealing, covering both materials and labor. To claim the credit, file IRS Form 5695 and ensure your contractor provides a Manufacturer’s Certification Statement for the materials used.
Local utility companies might also have rebates available. For instance:
- TVA EnergyRight: $300 rebate
- New Mexico Gas Company: $200 incentive
- Energy Trust of Oregon: No-cost duct sealing for manufactured homes
If you live in the Pacific Northwest, Envirosmart Solution can help you navigate these programs. They handle the paperwork and coordinate with approved contractors to ensure you get the maximum savings.
Why Regular Inspections Matter
Sealing ducts isn’t a one-and-done solution. Over time, factors like house settling or other repairs can create new leaks. That’s why scheduling professional HVAC maintenance twice a year – once in the fall before heating season and again in the spring before cooling season – is crucial. These check-ups can help identify leaks early and keep your system running efficiently.
Other tips for maintaining your system include:
- Changing air filters every three months
- Cleaning ducts every two to five years
- Watching for signs of trouble, like whistling sounds, uneven temperatures, or excess dust
Envirosmart Solution also offers maintenance packages to help you stay on top of these tasks. Their SMART DUCTS™ plan ($199) and SMART GOLD™ plan ($699) include regular inspections, filter replacements, and priority service to protect your investment and keep those energy savings rolling in.
Conclusion
Sealing your ducts can make a noticeable difference in your home’s efficiency and comfort. In fact, it could reduce your energy bills by up to 20% annually. Properly sealed ducts help maintain stable indoor temperatures, improve air quality, and even extend the lifespan of your HVAC system. Whether you tackle this project yourself or hire a professional, the payoff is clear.
The benefits of sealing ducts go beyond just savings. As Cary Weiner, Clean Energy Specialist at Colorado State University Extension, explains:
"A homeowner can lose up to 30% of the energy used to heat or cool a space if ducts are not properly sealed and insulated, particularly if the ducts run through unconditioned space."
For homeowners in the Pacific Northwest, Envirosmart Solution provides duct sealing services and expert advice on federal tax credits and local rebates. Their SMART DUCTS™ and SMART GOLD™ maintenance packages are designed to keep your ducts efficient year after year, ensuring you get the most out of your investment.
Don’t wait – seal those leaks for lower energy bills, better airflow, and a healthier living space.
FAQs
How do I know if my ducts are leaking?
Signs of ductwork issues include uneven room temperatures, unusually high energy bills, or trouble heating and cooling specific areas in your home. You might also spot visible holes or tears in the ducts themselves. A quick way to check for leaks is by using a flashlight to inspect for damage or testing with smoke or incense – if air is escaping, the smoke will shift or swirl near the leak. Performing regular inspections can help catch and address these problems early.
Is duct sealing better as a DIY project or a professional job?
Duct sealing is something you can tackle yourself or leave to the pros – it all depends on how confident you feel and how complex your duct system is. If you’re dealing with small, easy-to-reach leaks in spots like your attic or crawl space, a DIY approach might work just fine. But for those trickier, hard-to-access areas or if there are significant leaks, bringing in a professional is often the smarter choice. They have the tools and expertise to ensure the job is done thoroughly and your system runs as efficiently as possible.
Will duct sealing change indoor air pressure or backdraft risks?
Proper duct sealing plays a key role in managing indoor air pressure and lowering the risk of dangerous backdrafts. By minimizing leaks, sealed ducts help keep harmful gases – like carbon monoxide – out of your living spaces. However, there’s a trade-off: sealing can increase static pressure within the system. If your ductwork is too small or has blockages, this added pressure might lead to performance problems. That’s why having a professional evaluate your system is crucial to ensure both safety and efficiency.