Sealing your attic is one of the simplest ways to cut energy costs, improve comfort, and prevent issues like drafts, moisture damage, and poor air quality. By addressing gaps, cracks, and holes, you can stop heated or cooled air from escaping, reduce strain on your HVAC system, and avoid costly repairs down the line. Here’s what you need to know:
- Why Seal Your Attic?
- Save on energy bills by reducing air leaks.
- Prevent drafts, uneven temperatures, and moisture problems like mold or ice dams.
- Improve indoor air quality by blocking dust, radon, and other pollutants.
- What You’ll Need:
- Tools: Caulking gun, utility knife, staple gun, flashlight.
- Materials: Caulk, spray foam, rigid foam board, aluminum flashing.
- Safety Gear: Respirator, gloves, safety glasses, protective clothing.
- Steps to Seal Your Attic:
- Inspect for leaks and hazards like asbestos or outdated wiring.
- Seal gaps around chimneys, pipes, and ducts using fire-safe materials.
- Address large openings with foam board or drywall.
- Weatherstrip the attic hatch for added insulation.
- Re-check for leaks and ensure proper ventilation.
DIY projects cost under $100 in materials, but hiring professionals may cost over $2,000, including diagnostics and safety tests. Rebates or assistance programs may help reduce costs.
Whether you tackle it yourself or hire experts, sealing your attic is a smart way to boost comfort, lower bills, and protect your home.
How to Air-Seal an Attic and Save Money
Why You Should Seal Attic Air Leaks
Attic air leaks can have a bigger impact on your energy bills than you might think. When warm air escapes during winter – or hot air sneaks in during summer – your HVAC system has to work overtime to keep your home comfortable. That extra effort translates to higher utility bills.
But it’s not just about the money. These leaks can make your home less comfortable, too. Drafty rooms and uneven temperatures are common issues caused by conditioned air escaping through gaps in the attic. Instead of enjoying a steady indoor climate, you might find yourself dealing with chilly corners in winter or overly warm spots in summer.
There’s also a hidden risk: moisture. Warm, moist air rising into a cool attic can condense on cold surfaces, leading to mold growth, rotting rafters, and even ice dams. Fixing this kind of damage can be far more expensive than simply sealing the leaks in the first place.
Another concern is indoor air quality. The "stack effect" can pull dust, pest droppings, and even harmful gases like radon from lower parts of your home into your living spaces. If you’ve noticed more dust settling in rooms below the attic, it could be a sign that unfiltered air is circulating where it shouldn’t.
Sealing attic leaks isn’t just practical – it’s one of the most affordable ways to improve both your home’s energy efficiency and comfort. When combined with proper insulation, it’s a smart investment that pays off in lower bills and a cozier home.
Tools and Materials for Attic Air Sealing
Ready to take on sealing those attic air leaks? Great! This is not only an effective way to improve your home’s energy efficiency, but it’s also a budget-friendly project. Most DIY attic air sealing efforts can be completed for under $100 in materials, making it a cost-effective upgrade for your home. Here’s a breakdown of the tools, materials, and safety gear you’ll need to get started.
Tools You’ll Need
To tackle this project, you’ll need a few essential tools:
- Caulking gun: Perfect for applying sealant in gaps around wiring and plumbing.
- Retractable utility knife: Handy for trimming insulation and foam boards.
- Sheet metal scissors: Use these to cut aluminum flashing into custom shapes to fit around flue pipes.
- Staple gun: Secures flashing and blocking materials to wooden framing.
- Tape measure: Ensures precise measurements for larger openings like dropped soffits.
- Flashlight or portable drop light: Provides visibility in dimly lit attic spaces.
These tools will make the job smoother and ensure a snug, effective seal.
Materials to Prepare
Choosing the right materials depends on the size of the gaps you’re sealing. Here’s a quick guide:
- Small cracks (less than 1/4 inch): Silicone or acrylic latex caulk works well for minor gaps, such as those around wiring holes or top plate seams.
- Medium gaps (1/4 inch to 3 inches): Expanding spray foam is ideal for sealing around plumbing vent pipes or electrical chases.
- Large openings: Use rigid foam board, reflective foil insulation, or drywall to cover areas like dropped soffits or open stud cavities.
- Around chimneys and flues: High-temperature caulk paired with aluminum flashing creates a fire-safe barrier.
Here’s a handy table to summarize:
| Gap Size | Recommended Material | Common Uses |
|---|---|---|
| Less than 1/4 inch | Silicone or acrylic latex caulk | Wiring holes, plumbing penetrations, top plates |
| 1/4 inch to 3 inches | Expanding spray foam | Plumbing stacks, electrical chases |
| Large openings | Rigid foam board, reflective foil, drywall | Dropped soffits, open wall cavities |
| Around flues/chimneys | High-temperature caulk with aluminum flashing | Areas requiring fire-code compliance |
Safety Equipment
Attic work can be tough on your body, so it’s essential to gear up with the right safety equipment. Here’s what you’ll need:
- Respirator or dust mask: Choose an OSHA-approved particulate respirator or a double-strap dust mask to keep insulation fibers out of your lungs.
- Protective clothing: Lightweight disposable coveralls, gloves, and a hat will shield your skin from fiberglass irritation.
- Safety glasses: Protect your eyes from airborne particles and debris.
- Hard hat or sturdy cap: Prevent injuries from protruding roofing nails.
- Knee pads: Make moving across joists more comfortable and less stressful on your knees.
And always remember: walk on ceiling joists or truss chords – not on insulation or drywall – to avoid accidents like falling through the ceiling. With the right preparation, you’ll be ready to tackle your attic sealing project efficiently and safely!
How to Seal Your Attic: Step-by-Step Instructions
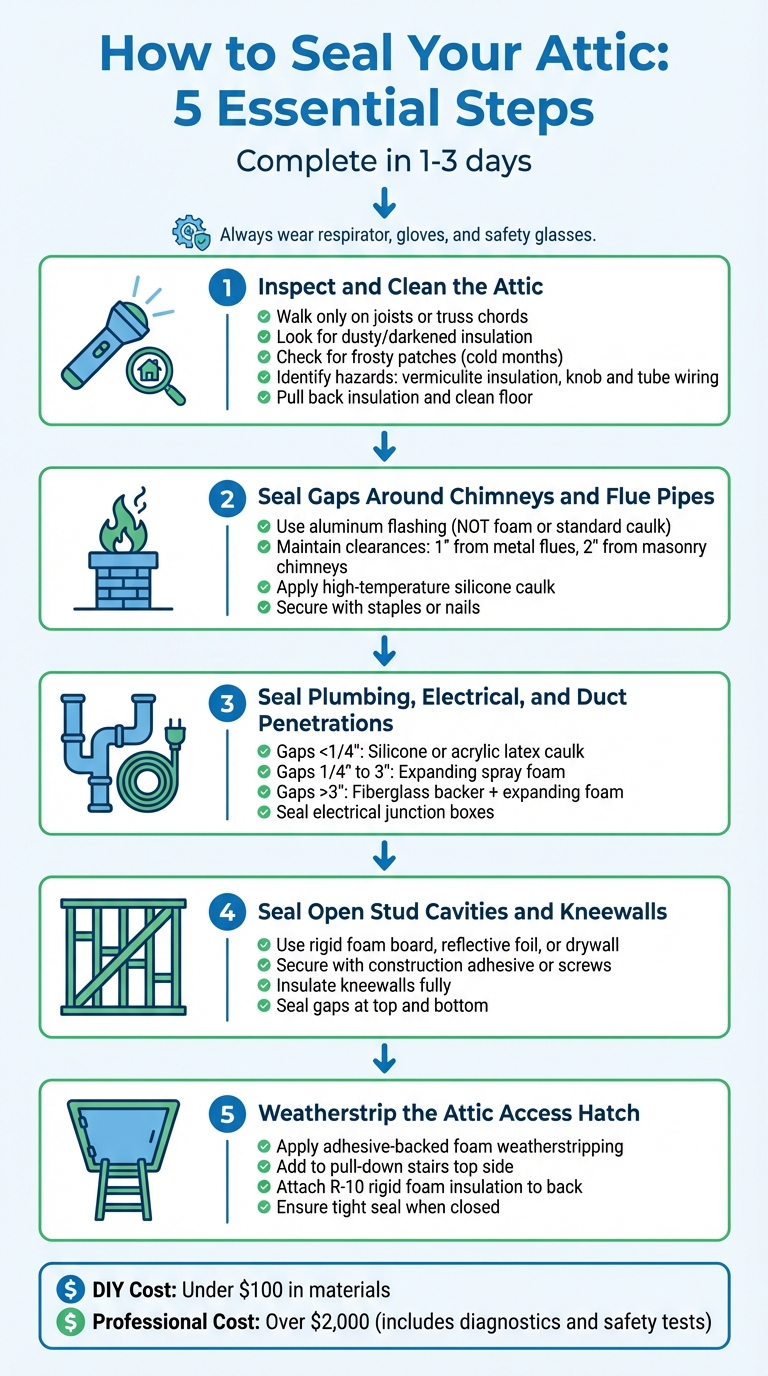
5-Step Attic Air Sealing Process Guide
Ready to seal your attic? With the right tools and materials, you can tackle this project in 1 to 3 days. Follow these steps to address common air leaks effectively and safely.
Step 1: Inspect and Clean the Attic
Start by inspecting your attic. Be careful to walk only on joists or truss chords – stepping on insulation or drywall could cause damage or injury. Look for signs of air leaks, such as dusty or darkened insulation. In colder months, frosty patches might indicate areas where warm, moist air has condensed and frozen.
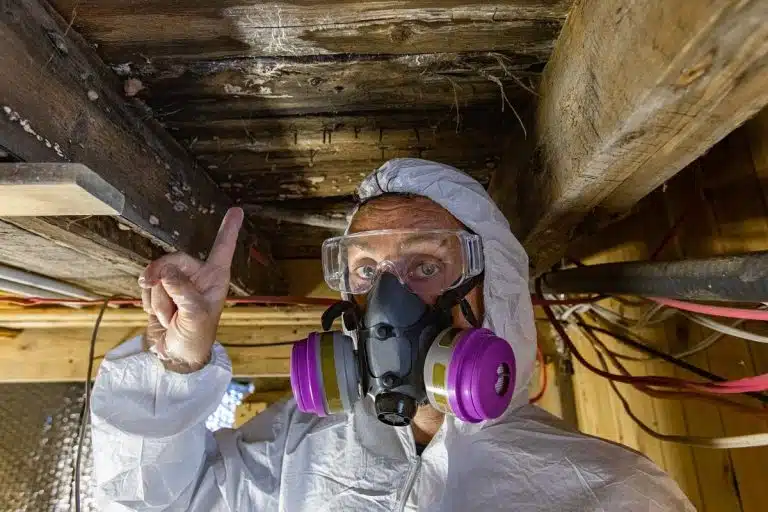
Check for potential hazards like vermiculite insulation or knob and tube wiring. Vermiculite, often appearing as a flaky, gray material, can contain asbestos. If you find it, stop work immediately and have it tested by a certified lab through your local health department. Similarly, knob and tube wiring (common in homes built before the 1930s) should be inspected by an electrician, as it can pose a fire risk when it comes into contact with insulation. Once the area is safe, pull back insulation from the spots you plan to seal and clean the attic floor to help sealants adhere properly.
Step 2: Seal Gaps Around Chimneys and Flue Pipes
Large gaps around chimneys and flues are major sources of air leakage and require careful attention. These areas need to meet fire safety standards. As ENERGY STAR advises, "Because the pipe gets hot, building codes usually require 1 inch of clearance from metal flues (2 inches from masonry chimneys) to any combustible material, including insulation". Avoid using expanding foam or standard caulk here – they’re not heat-resistant and could melt or ignite.
Instead, use aluminum flashing. Cut two pieces of flashing to fit around the flue, ensuring they overlap by about 3 inches for a snug fit. Apply high-temperature silicone caulk where the flue meets the attic floor, press the flashing into place, and secure it with staples or nails. Add another bead of caulk to seal any gaps. To maintain proper clearance, wrap the flue with a coil of flashing, bending the top and bottom tabs inward and outward, respectively.
Step 3: Seal Plumbing, Electrical, and Duct Penetrations
Next, address gaps around pipes, wires, and ducts. Use silicone or acrylic latex caulk for gaps smaller than 1/4 inch. For gaps between 1/4 inch and 3 inches, expanding spray foam is your best bet – just remember to wear gloves because it’s sticky. For openings larger than 3 inches, start by stuffing unfaced fiberglass insulation into the gap as a backer, then cover it with expanding foam.
Pay close attention to electrical junction boxes. Seal both the perimeter of the box and the holes where wires enter. Once the sealant has dried, reposition any displaced insulation to maintain the attic’s thermal efficiency.
Step 4: Seal Open Stud Cavities and Kneewalls
For open stud cavities above soffits or behind kneewalls, use rigid foam board, reflective foil insulation, or drywall. Secure these materials with construction adhesive or screws to block air movement. If you’re working on kneewalls, make sure they’re fully insulated, and seal any gaps at the top or bottom of the wall with foam board or caulk.
Step 5: Weatherstrip the Attic Access Hatch
Don’t overlook your attic access hatch – it’s a common source of air leaks. Apply adhesive-backed foam weatherstripping around the edges where the hatch meets the frame. For pull-down stairs, add weatherstripping to the top side of the door so it compresses when closed. To further insulate, you can attach a layer of rigid foam insulation to the back of the hatch using construction adhesive, ensuring it still seals tightly when closed.
sbb-itb-8db64ac
Final Inspection and Maintenance
Inspection Checklist
Once you’ve sealed your attic, it’s time to give it a thorough re-check. Look for any lingering leaks, especially areas where insulation appears dirty or darkened – these can be telltale signs of moisture issues. Seasonal indicators like frosty patches in winter or water stains in summer should no longer be present.
Pay close attention to the attic access hatch. It should be properly gasketed and insulated with at least R-10 rigid foam. Make sure ventilation baffles are still in place and provide at least 6 inches of clearance above the insulation. Around chimneys and flues, confirm that high-temperature caulk and metal dams are installed. These should maintain the necessary clearances: 1 inch from metal flues or 2 inches from masonry chimneys to any combustible materials.
If your home uses gas or oil appliances, it’s critical to perform a combustion safety test to ensure there’s no backdrafting. Additionally, the EPA advises using a radon test kit after sealing your attic, as changes in airflow can sometimes affect how soil gases enter your home.
Once everything checks out, you’re ready to move on to maintaining your attic’s performance over time.
Maintenance Tips
Make it a habit to inspect your attic annually for any signs of moisture, mold, or rotted materials, which could hint at roof leaks or problems with exhaust fans. During winter, watch for ice dams on your roof. These are a sign that heat may still be escaping into the attic, indicating the need for more sealing. Also, confirm that all kitchen, bathroom, and dryer exhaust fans continue to vent directly outdoors rather than into the attic space.
Periodically measure the depth of your insulation to ensure it remains evenly distributed and free from compression. A proper installation should have less than 2% gaps, voids, or compressions in the insulation layer. Keep an eye out for seasonal temperature changes that might expose hidden leaks. Drafts, uneven room temperatures, or unexpectedly high energy bills are all signs that additional air sealing may be needed.
Professional Attic Air Sealing Services
While tackling attic air sealing on your own might cost less than $100 in materials, hiring a professional often exceeds $2,000. Why the higher price tag? It includes not just labor but also thorough safety testing, diagnostics, and addressing potential hazards.
Professional contractors bring more to the table than just sealing materials. They have the tools and expertise to uncover hidden issues like vermiculite insulation or outdated electrical wiring – problems that require skilled handling to ensure safety and compliance with building codes. Their work goes beyond sealing; they conduct critical tests to ensure your home’s safety. For instance, they check gas or oil appliances to prevent toxic gases from back-drafting into your living space after sealing reduces airflow. Additionally, they assess whether mechanical ventilation is needed to avoid the buildup of indoor pollutants such as radon, VOCs, and carbon monoxide.
You might be able to offset some of the costs by checking with your local utility company. Many utilities offer rebates for home energy assessments and air sealing projects. You could also qualify for the Weatherization Assistance Program (WAP), which provides free professional air sealing and insulation through state-run initiatives. These programs not only reduce costs but also enhance the energy-saving benefits of proper air sealing.
In regions like the Pacific Northwest, where energy efficiency is especially important, companies like Envirosmart Solution provide comprehensive attic air sealing services. They help homeowners take advantage of government, local, and vendor rebates, making what might seem like an expensive project far more manageable. Their team handles everything – from the initial inspection and identifying hazards to completing the sealing process and conducting follow-up testing.
Professional sealing projects generally take just 1–2 days, compared to the 1–3 days DIY efforts might require. This shorter timeline reduces disruption to your household while ensuring the work meets building codes. If your attic has limited access, visible moisture or mold, or ventilation issues, hiring a qualified contractor is highly recommended. With professional services, you not only improve energy efficiency but also ensure your home’s safety – delivering peace of mind along with lower energy bills.
Conclusion
Sealing attic leaks can lower energy bills, create more consistent indoor temperatures, and improve air quality. According to ENERGY STAR:
"The attic is usually where you can find some of the largest opportunities to save energy in your home".
By tackling significant leaks, you can eliminate drafts and minimize the stack effect, which often pulls in contaminants. Proper air sealing also safeguards your home from issues like ice dams and moisture damage that could lead to mold or wood rot in your attic rafters. These benefits highlight why addressing attic leaks is so important.
Whether you choose a DIY approach or hire a professional, the investment can quickly pay off. Be sure to explore local rebates or assistance programs that might help reduce costs.
If you’re looking for expert assistance, Envirosmart Solution offers a full-service package that includes everything from inspections to final testing. They can also help you take advantage of government or vendor rebates, ensuring your home becomes more energy-efficient, safe, and comfortable.
Don’t wait to take action. Start with a detailed inspection, gather the necessary materials, and seal those leaks – or call in the pros if your attic is hard to access or presents safety concerns. Either way, you’ll enjoy a cozier, more energy-efficient home for years to come.
FAQs
How can I tell if my attic has air leaks?
If your attic has air leaks, you might notice drafts or feel air moving around specific spots like attic hatches, kneewalls, wiring holes, plumbing vents, recessed lights, or even windows and doors leading to the attic. Another clue? Dirty insulation – a sign that air is passing through and carrying dust with it.
During the colder months, these leaks can become even more obvious. You might feel cold air seeping in or spot visible gaps. Other red flags include moisture buildup, mold growth, or damaged insulation – all potential consequences of unwanted air infiltration. Fixing these problems can make your home more energy-efficient and comfortable.
How do I make sure my attic sealing is fire-safe?
To make sure your attic sealing meets fire safety standards, start by addressing gaps and openings with fire-resistant materials. Around hot flues or chimneys, use fire-rated sealants or collars specifically made to handle high temperatures. If you have non-IC-rated recessed lights, cover them with protective enclosures to prevent overheating risks.
Large holes and soffits should also be sealed with fire-resistant materials, and always maintain proper clearance around any heat-producing fixtures. Before beginning your project, inspect for outdated wiring or appliances that could create fire hazards. For added peace of mind, review local building codes or consult a professional to ensure your work aligns with fire safety requirements.
Can I get financial incentives for sealing attic air leaks?
Yes, if you’re in the United States, there are financial perks for sealing attic air leaks. Homeowners can take advantage of various federal, state, and local programs that offer rebates or tax credits for improving energy efficiency through attic sealing and insulation. These incentives not only help offset the initial costs but can also lead to lower energy bills over time.
For instance, some utility companies provide rebates specifically for attic insulation and air sealing. On top of that, the federal government often offers tax credits for energy-efficient home upgrades. Local programs might also feature seasonal deals or special discounts, so it’s a good idea to check with your utility provider or local energy office to see what’s available. Sealing attic leaks doesn’t just make your home more comfortable – it can also save you money with these programs.