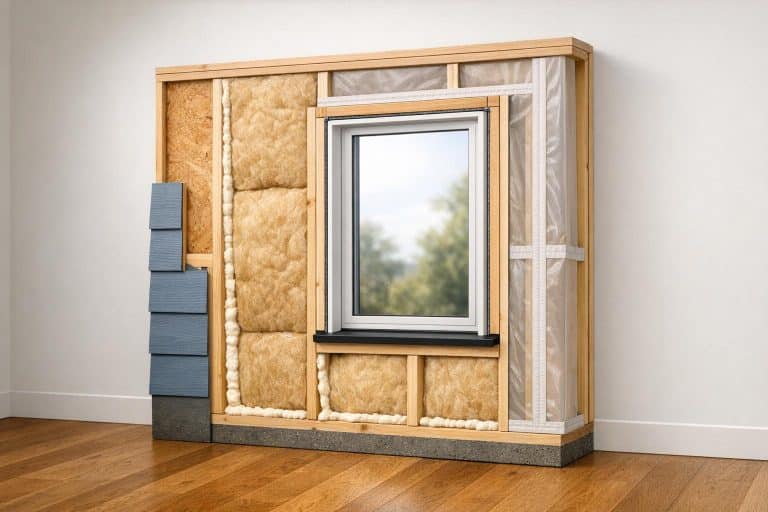
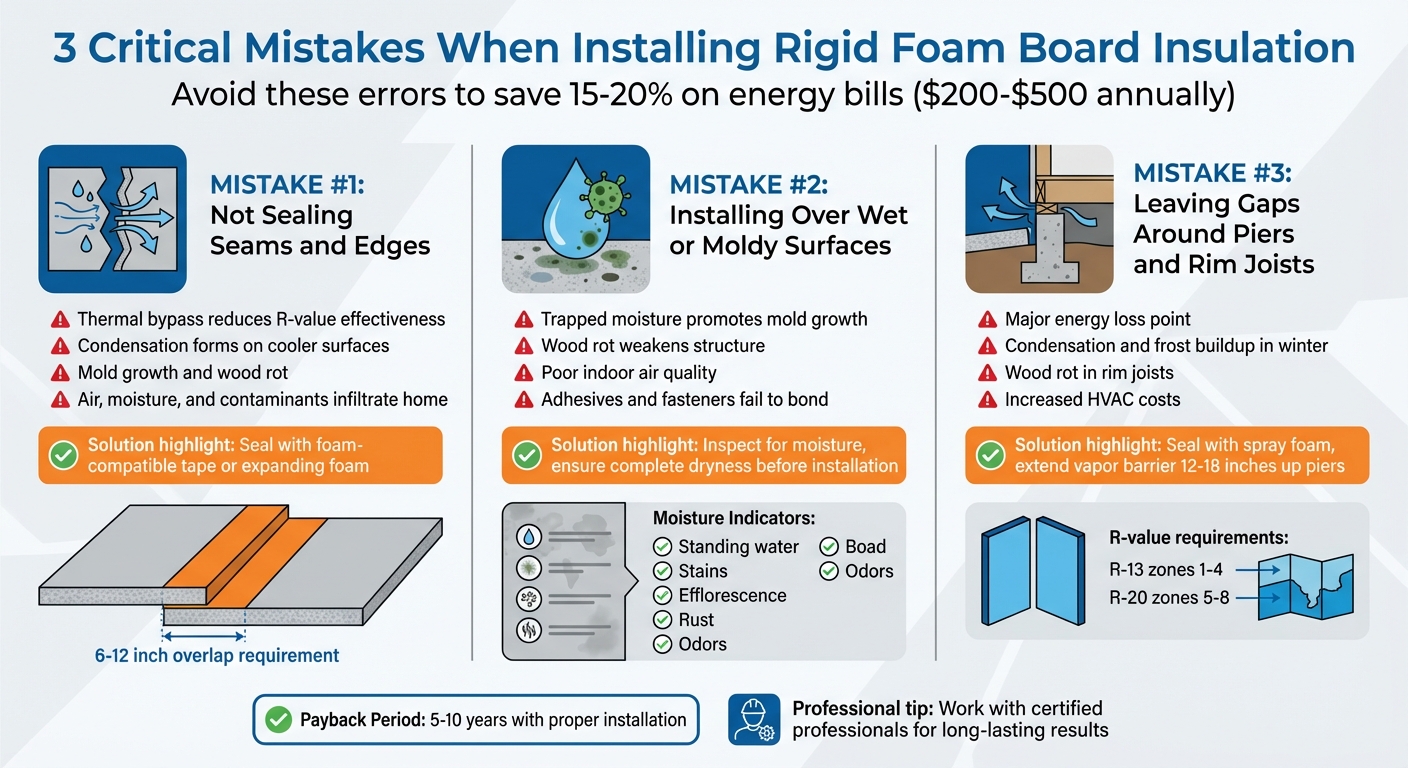
Rigid foam board is a great option for insulating crawl spaces, offering strong thermal resistance and moisture protection. But improper crawl space insulation installation can lead to energy loss, mold, and structural damage. Here are the three most common mistakes to avoid:
- Not sealing seams and edges: Gaps allow air and moisture to bypass the insulation, reducing its effectiveness and causing condensation.
- Installing over wet or moldy surfaces: Trapped moisture promotes mold growth and weakens the structure.
- Leaving gaps around piers and rim joists: These unsealed areas let in air and moisture, undermining insulation and increasing energy costs.
Avoid these errors to maximize energy savings (15–20%, or $200–$500 annually) and protect your home’s structure.
3 Common Rigid Foam Board Installation Mistakes and Their Consequences
DIY Crawl Space Foam Board Trick You Need to Try!
sbb-itb-8db64ac
1. Not Sealing Seams and Edges Correctly
One of the biggest missteps homeowners make with rigid foam board insulation is not sealing the seams and edges properly. When warm, moist air comes into contact with the cooler surfaces behind unsealed boards, condensation forms. This can lead to mold growth and wood rot and even wood rot over time.
Air Sealing Effectiveness
Gaps in the seams allow for thermal bypass, where unconditioned air flows behind the insulation rather than being blocked. This significantly reduces the foam board’s R-value, even if high-quality materials are used. The natural stack effect in homes pulls air from crawl spaces upward into living areas. Any unsealed gaps in the foam board allow this air, along with moisture and contaminants, to infiltrate your home.
"Even small gaps allow humid air to infiltrate, undermining the entire system." – Basement Medics
Moisture Management
Sealing the seams and edges of foam board is essential to prevent vapor bypass – where moisture sneaks around the insulation. This is particularly important where wall insulation meets the ground vapor barrier. To create a continuous moisture barrier, overlap these two components by at least 6 to 12 inches and seal them with appropriate tape or sealant. Without this critical seal, ground moisture and soil gases, such as radon, can creep into your home’s structure, potentially damaging wooden joists and subflooring.
Installation Precision
Always use foam-compatible materials when sealing. High-performance foil tape, water-based mastics, or expanding spray foam designed for foam insulation will provide durable seals without harming the boards. Before applying any sealant, ensure the surfaces are clean and free of dust or debris, as dirty surfaces can prevent proper adhesion and cause seal failure. For larger gaps, such as those around pipes or cables, use approved expanding foam sealers to maintain an airtight seal. Additionally, secure the boards with masonry fasteners and button cap washers to keep them firmly against the foundation walls, avoiding air pockets behind the insulation. By following these steps, you’ll ensure your insulation performs as intended and provides long-term benefits.
2. Installing Over Wet or Moldy Surfaces
Installing rigid foam boards on wet or moldy surfaces is a mistake that can lead to serious problems. Moisture trapped behind the boards can promote mold growth and wood rot, which may weaken your home’s structure and harm indoor air quality. Proper moisture management is key to ensuring your insulation performs as intended.
Moisture Management
While rigid foam boards are designed to resist moisture, they can trap water if installed over wet surfaces. This can lead to significant issues. As Atticare USA explains:
"Any moisture trapped behind insulation is just that, trapped. The moisture causes mold growth and wood rot that damage the integrity of their home as well as its air quality." – Atticare USA
Before installing insulation, carefully inspect your crawl space for signs of moisture. Look for standing water, damp soil, or water stains near the foundation and plumbing fixtures. Other indicators, like mineral deposits (efflorescence) on walls, rusted metal components, or musty odors, can signal ongoing moisture problems.
Address these issues before proceeding. Consider extending gutters 6 to 8 feet away from the house to improve drainage or installing wet crawl space repair systems. The surface must be completely dry before you begin installation.
Installation Precision
Moisture doesn’t just create mold – it also undermines the installation process. Wet surfaces prevent adhesives, fasteners, and sealing tapes from bonding properly, which can reduce the insulation’s thermal performance and energy efficiency.
If you find mold, don’t attempt to handle it yourself. Instead, contact a certified remediation expert to clean the affected areas before moving forward. Ensuring a clean, dry surface is essential for effective and long-lasting insulation.
3. Leaving Gaps Around Piers and Rim Joists
When it comes to insulating your crawl space, gaps around piers and rim joists can be a major weak spot. These areas – where the foundation wall, mudsill, rim joist, and subfloor come together – are particularly prone to air leaks and moisture intrusion. Leaving them unsealed invites unconditioned air and ground moisture into your home, undermining insulation efforts.
Why Air Sealing Matters
The rim joist area is notorious for energy loss. During the winter, warm, humid indoor air can escape through unsealed gaps and meet the cold surface of rim joists, causing condensation or even frost. Over time, this moisture buildup can lead to wood rot. As Martin Holladay, Editor at Fine Homebuilding, explains:
"In cold weather, condensation or frost can build up on the interior side of a rim joist… In just a few short years, this type of moisture accumulation can be serious enough to rot out the rim joist."
This not only weakens your home’s structural integrity but also forces your HVAC system to work overtime, increasing utility costs and making temperature regulation a challenge. To address this, building codes mandate rim joists to be insulated to an R-13 minimum in climate zones 1 through 4 and an R-20 minimum in zones 5 through 8.
Getting the Job Done Right
Sealing gaps around piers and rim joists requires attention to detail. These spaces are often crowded with plumbing, electrical wiring, or other obstacles, making the process tricky. Here’s a practical approach:
- Prepare the Area: Begin by cleaning the joist area and foundation to remove dirt and debris. This ensures proper adhesion.
- Seal Key Cracks First: Use sealant to close the gap between the concrete foundation and sill plate.
- Install Foam Boards: Cut foam boards slightly smaller than the cavity for easier placement, then secure them with construction adhesive or masonry fasteners.
- Reach Tight Spots: For hard-to-access gaps behind piers or between joists, attach flexible vinyl tubing to your spray foam nozzle to extend its reach.
- Seal the Vapor Barrier: Extend your vapor barrier 12 to 18 inches up the crawl space piers to block ground moisture and soil gases.
For an efficient solution, consider using two-component spray foam kits like Dow Froth-Pak, which are specifically designed for sealing these types of gaps. Properly sealing these areas not only improves insulation performance but also protects your home from long-term damage.
How Envirosmart Solution Can Help
![]()
Installing rigid foam board in crawl spaces isn’t a DIY-friendly task – it takes expertise to get it right. That’s where Envirosmart Solution steps in, offering a well-rounded approach to tackle common mistakes in crawl space insulation.
The process kicks off with a detailed moisture assessment. Their technicians identify and address moisture problems like leaking pipes or poor drainage to prevent water from getting trapped behind the foam boards. They also install vapor barriers (6‑mil or thicker) that cover the crawl space floor and extend 12–18 inches up walls and piers, with seams carefully overlapped and sealed.
Once moisture issues are under control, they focus on air sealing – a step that’s often overlooked but crucial. Using industry-approved fasteners and techniques, they seal areas like rim joists and vent openings to ensure no air leaks through. For those tight, hard-to-reach spots, they rely on specialized tools and techniques to ensure every inch is covered.
To keep your insulation performing at its best, Envirosmart Solution offers their CRAWL SPACE & ATTIC CARE™ maintenance plan for $199 per year. This plan includes annual inspections to catch potential problems early, such as torn vapor barriers, shifted insulation, or new signs of moisture. Considering properly installed crawl space insulation can cut energy bills by 15–20% and has a payback period of 5 to 10 years, regular maintenance helps protect your investment for the long haul.
Envirosmart Solution also helps homeowners take advantage of available rebates from government programs, utility companies, and vendors. Their streamlined service – from evaluation to installation and ongoing care – ensures your crawl space insulation works efficiently for years to come.
Conclusion
When it comes to rigid foam board installation, there are three key mistakes you’ll want to avoid: failing to seal seams properly, installing over damp or moldy surfaces, and leaving gaps around piers and rim joists. These issues highlight the importance of professional installation to get the job done right.
"Improper insulation can lead to moisture buildup, heat loss, and poor indoor air quality, driving up energy bills while promoting mold, decay, and structural deterioration." – AllStar Insulation One
When installed correctly, rigid foam board creates an airtight barrier, keeping unconditioned air out and maintaining a comfortable indoor environment.
Investing in proper crawl space insulation can cut heating and cooling costs by 15–20%, with the savings often covering the initial cost in just 5 to 10 years. For reliable and long-lasting results, it’s wise to work with certified professionals. Contact Envirosmart Solution for expert crawl space insulation services and enjoy an energy-efficient home. Partnering with specialists ensures your insulation will perform effectively for years, protecting both your home and your investment.
FAQs
What’s the best way to seal rigid foam board seams in a crawl space?
To seal the seams of rigid foam board in a crawl space, start by using spray foam or a suitable sealant along the seams and edges. This creates airtight connections, helping to block air leaks and keep moisture out. For extra protection, you can add a continuous vapor barrier over the foam boards. Make sure to thoroughly seal all joints and gaps, as this is key to keeping the insulation effective and preventing problems like condensation or air leaks.
How can I tell if my crawl space is too wet to insulate with foam board?
Take a close look at your crawl space for any signs of water, excessive humidity, or moisture-related problems like mold spots or a musty odor. If you notice standing water or ongoing dampness, it’s a clear sign the area is too wet for foam board insulation. Installing insulation in such conditions can lead to mold growth and other issues.
Make sure the space is thoroughly dried, and resolve any moisture problems before moving forward with insulation. This step is crucial to ensure the insulation works effectively over time and avoids potential damage.
What’s the right way to insulate and air-seal rim joists and piers?
To properly insulate and air-seal rim joists and piers, you can use rigid foam or spray foam insulation. These materials help reduce heat loss, block moisture, and keep pests at bay. Here’s how to do it:
- Seal gaps with caulk: Start by filling any cracks or openings to create a solid base for insulation.
- Apply insulation: Attach rigid or spray foam directly to the surfaces of rim joists or piers.
- Ensure airtight seals: Pay attention to the joints, ensuring they’re tightly sealed to maximize effectiveness.
Don’t forget to check your local building codes for specific requirements. For piers, rigid foam is particularly effective at boosting energy efficiency and reducing condensation issues.