If your attic feels like a furnace in summer and your energy bills are climbing, radiant barriers might be worth it as a solution. These foil-based materials reflect up to 97% of radiant heat, reducing attic temperatures by as much as 30°F. For hotter states like Texas or Florida, this can cut cooling costs by 5%–15% annually, saving $75–$150 per season.
Here’s a quick breakdown of costs:
- DIY Installation: $150–$400 for materials, taking about 8 hours of labor.
- Professional Installation: $710–$2,840, completed in 1–2 days.
While DIY saves on labor, professionals ensure proper installation, which impacts long-term performance. In hot climates, DIY projects can pay off in 1–3 years, while professional work takes 3–8 years but lasts longer (up to 100 years). Choose based on your budget, skill level, and attic layout.
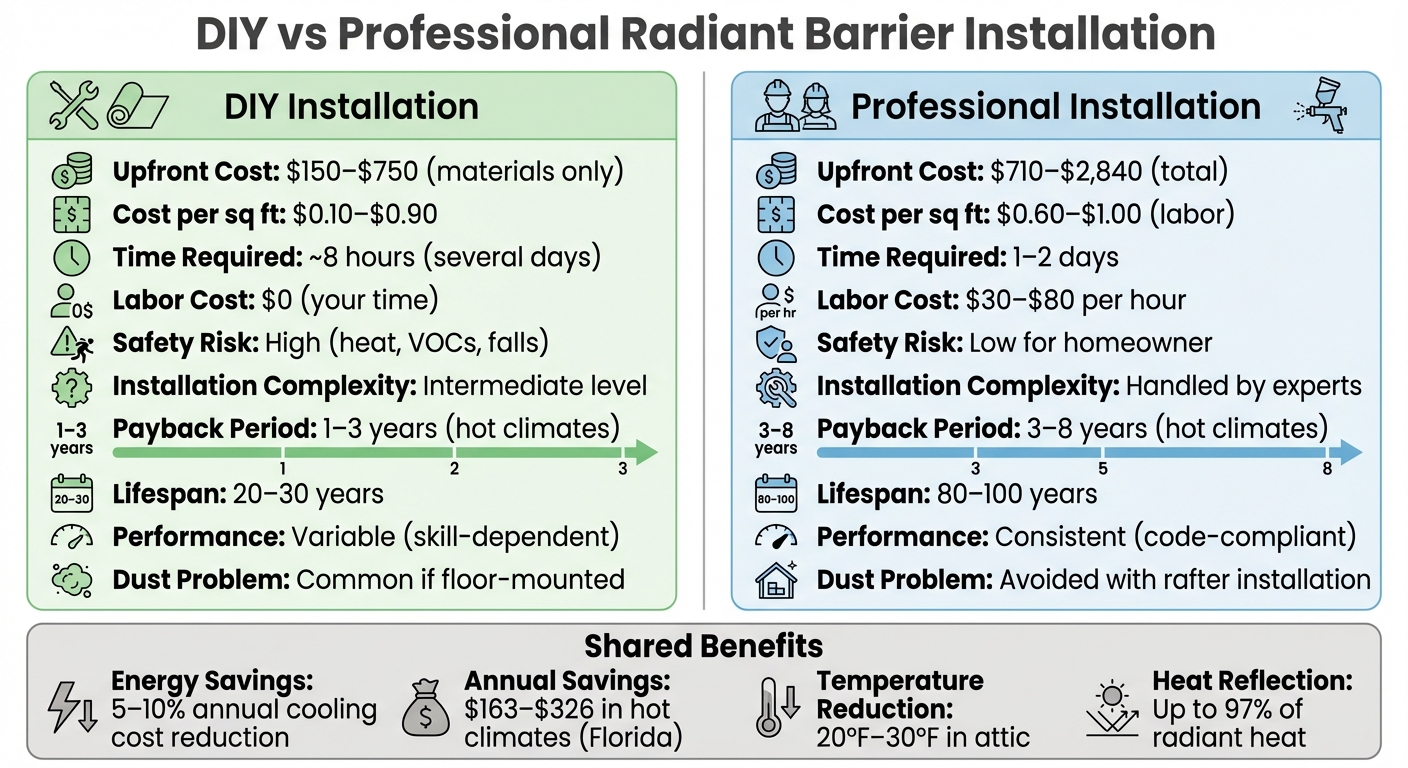
DIY vs Professional Radiant Barrier Installation Cost Comparison 2025
Installing Attic Radiant Barrier Insulation – Truss Built Attic.mpg
sbb-itb-8db64ac
1. DIY Radiant Barrier Installation
When weighing the choice between DIY and professional installation, it’s essential to consider everything from material costs to the complexity of the process. This helps homeowners make decisions that align with their budget and abilities.
Cost
The materials for a DIY radiant barrier installation typically cost between $0.10 and $0.90 per square foot, depending on whether you opt for one-sided or two-sided foil. For a 1,500-square-foot attic, you’re looking at a total expense of $150 to $400.
- One-sided foil: $0.10 to $0.50 per square foot
- Two-sided foil: $0.15 to $1.10 per square foot
Two-sided foil is particularly effective when placed over attic floor insulation since it maintains its performance even as dust accumulates on the surface.
Here’s a quick look at popular brands and their price ranges:
- US Energy Products: $0.10–$0.60 per square foot
- Radiant GUARD: $0.15–$0.20 per square foot
- Attic Foil: $0.20–$0.30 per square foot
If you’re considering spray-on coatings, a 5-gallon bucket will cost $250 to $400 and cover between 500 and 2,000 square feet. However, you’ll also need an airless paint sprayer, which costs $100 to $600, along with safety gear like a respirator and coveralls, adding another $30 to $100 to your budget.
Installation Complexity
Installing a radiant barrier yourself is considered an intermediate-level project and usually takes about 8 hours for a standard attic. You’ll need a few basic tools: a staple gun, utility knife, and tape measure. The process involves measuring your attic (accounting for the roof pitch), cutting foil sheets, and attaching them to roof rafters or laying them over floor insulation.
The main challenge lies in working in a hot, confined attic space with limited stable flooring. In the summer, attic temperatures can soar to 150°F, so it’s best to schedule the installation for cooler months or early mornings. Be sure to disconnect power sources for safety, use a headlamp to keep your hands free, and leave a 2–3 inch gap at the ridge and soffits for ventilation to avoid moisture buildup and potential roof damage.
While the process isn’t overly complex, the effort pays off with noticeable energy savings.
Energy Savings
In hot, sunny areas, radiant barriers can cut cooling costs by 5% to 10% annually. For homeowners in regions like Florida, this translates to savings of $163 to $326 per year. The benefits are even more pronounced if your HVAC ductwork is located in the attic. By lowering the surrounding air temperature by 20°F to 30°F, the barrier helps your system run more efficiently.
Return on Investment
DIY radiant barrier installations save on labor costs, leading to a quicker return on investment. In the hottest climates (Zones 1–2), you can expect to recoup your costs within 1 to 3 years. For slightly cooler areas (Zone 3), the payback period extends to 2 to 5 years.
Radiant barriers typically last 20–30 years, making them a long-term solution. For the best performance, it’s recommended to staple perforated foil to the underside of roof rafters. This method minimizes the impact of dust accumulation, which can reduce effectiveness if the barrier is placed on the attic floor, where dust can build up within 3 to 5 years.
2. Professional Radiant Barrier Installation
Cost
Hiring a professional for radiant barrier installation typically costs between $710 and $2,840, with most homeowners spending around $1,600 to $1,700 for a standard attic. Labor charges usually fall between $0.60 and $1.00 per square foot, or about $30 to $80 per hour. For a 1,500-square-foot attic, the total cost – including attic insulation materials and labor – can range from $1,050 to $3,000, depending on factors like attic layout, the type of materials used, and the installation method.
Installation Complexity
Professional installers can finish the job in just 1 to 2 days, far quicker than most DIY efforts. They ensure the proper air gap is maintained on at least one side of the barrier, which is crucial for its reflective properties. Professionals also handle compliance with local building codes, ensure proper ventilation to prevent moisture issues, and work safely in high-temperature conditions while addressing VOC exposure concerns. Their expertise not only speeds up the process but also guarantees your radiant barrier performs as intended.
Energy Savings
A professionally installed radiant barrier can cut cooling costs by 5% to 10%, translating to annual savings of about $163 to $326 in hot climates like Florida. Homes with HVAC ductwork in the attic see additional benefits, as the barrier helps protect ducts from extreme temperature swings, improving overall system efficiency.
Return on Investment
Although professional installation has higher upfront costs, the precision and expertise deliver long-term value. In hot regions (Zones 1–3), the investment often pays off in 3 to 8 years, compared to 1 to 3 years for DIY projects. A professionally installed radiant barrier can last 80 to 100 years, often outliving the roof itself. When done correctly, it reflects 90% to 97% of radiant heat, reducing attic heat gain by 25% to 40%. Beyond energy savings, professional installation ensures the system’s durability and effectiveness for decades.
Pros and Cons
Here’s a quick look at the trade-offs between DIY and professional installation of radiant barriers. Your decision boils down to weighing upfront savings against long-term performance, safety, and convenience. Both options have distinct advantages and challenges that impact your budget, time, and the barrier’s effectiveness over time.
DIY installation is budget-friendly, with costs ranging from $150 to $750 for materials. However, it requires a lot of physical effort and comes with safety risks like heat exposure, handling materials with VOCs, and potential falls. Without proper placement – like stapling the foil to rafters instead of laying it on the attic floor – performance can drop significantly due to dust accumulation within a few years. While the initial savings are appealing, these risks and the potential for reduced efficiency make it a choice best suited for those confident in their skills.
Professional installation, on the other hand, is more expensive, costing between $710 and $2,840. The higher price tag includes labor and ensures proper installation, which prevents dust issues and maintains the required air gap. Professionals complete the job in 1–2 days, handle code compliance, and ensure optimal performance – boosting efficiency by up to 10% compared to poorly executed DIY installations. While the payback period for professional work may be longer in hot climates (3–8 years), it offers peace of mind and consistent results.
Here’s a side-by-side comparison to help you decide:
| Feature | DIY Installation | Professional Installation |
|---|---|---|
| Upfront Cost | $150–$750 (materials only) | $710–$2,840 (total) |
| Time Required | Several days | 1–2 days |
| Labor Cost | $0 (your time) | $0.60–$1.00 per sq. ft. |
| Safety Risk | High (heat, VOCs, falls) | Low for homeowner |
| Dust Problem | Common if floor-mounted | Avoided with rafter installation |
| Payback Period | 1–3 years (hot climates) | 3–8 years (hot climates) |
| Performance | Variable (skill-dependent) | Consistent (code-compliant) |
"Roughly half the project cost of a radiant barrier comes from labor, so you can save money by doing it yourself. However, the installation work is challenging and can also be dangerous." – Angi
Your choice should depend on your attic’s layout and your comfort level with the work. Open, accessible attics are better suited for DIY, while cramped or complex spaces – and projects involving spray-on coatings – are better left to professionals. Consider the risks, costs, and your own capabilities when making your decision.
Conclusion
Deciding between DIY and professional radiant barrier installation comes down to your budget, skill level, and attic layout. For a DIY project, expect costs between $150 and $400, which can pay off in as little as 1 to 3 years in hot climates – especially if your attic is straightforward and easy to access. On the other hand, hiring professionals will cost between $710 and $2,840. While this option takes longer to recoup costs (3 to 8 years), you benefit from expert installation, ensuring proper air gaps and compliance with building codes while avoiding potential safety hazards.
Your local climate plays a huge role in determining the effectiveness of radiant barriers. In hot, sunny areas, these barriers can lower cooling costs and reduce attic temperatures by up to 30°F. However, in cooler climates, the benefits are minimal, typically offering only slight heating savings. In these cases, consulting a professional is crucial to determine whether the investment is worthwhile.
For homeowners in the Pacific Northwest, Envirosmart Solution offers tailored services to maximize the efficiency of radiant barriers. Their team uses perforated foil to prevent moisture-related issues common in the region and helps clients take full advantage of government, local, and vendor rebates to offset installation costs. Beyond radiant barriers, they provide comprehensive services like insulation upgrades and HVAC optimization, making them a go-to resource for improving home comfort and energy efficiency.
To get the best results, combine a radiant barrier with proper insulation (R-38 to R-60) and effective air sealing. A radiant barrier is a great addition, but it works best as part of a well-insulated and ventilated attic system. Whether you go the DIY route or hire professionals, the key is to choose an approach that aligns with your home’s specific needs, your budget, and your energy-saving goals.
FAQs
Is a radiant barrier worth it in my climate?
Radiant barriers work best in hot climates, where they can significantly lower attic temperatures – by as much as 25–40%. This cooling effect can lead to a reduction in energy use ranging from 5–10%, making them a smart choice for reducing cooling costs. Plus, they often deliver a return on investment exceeding 100%. However, in colder climates that depend more on heating than cooling, their effectiveness is much lower.
Where should a radiant barrier be installed for best results?
For the best results in reflecting heat and boosting energy efficiency, a radiant barrier should be placed in the attic. Ideally, it should be installed either beneath the roof deck or along the rafters. This positioning minimizes heat transfer, helping to lower energy costs and keep your home more comfortable.
Will a radiant barrier cause moisture or ventilation problems?
A well-installed radiant barrier works by reflecting heat effectively and avoids causing any moisture or ventilation problems. On the other hand, improper installation or a lack of sufficient ventilation can result in issues like moisture buildup. To prevent such problems, it’s critical to ensure the barrier is installed correctly and that there’s adequate airflow.