The attic is often one of the most overlooked areas of the home, yet it plays a critical role in energy efficiency, indoor air quality, and overall structural integrity. For homeowners in the Greater Seattle and Puget Sound region, where damp winters and fluctuating temperatures are the norm, properly insulating your attic is not just about comfort – it’s about protecting your home and reducing energy costs.
This article breaks down the process of installing attic boards and R38 insulation, based on insights from a DIY video filmed in a remote, off-grid location. While the setting may be rustic, the lessons learned are highly relevant for Pacific Northwest homeowners looking to strengthen their property against the region’s unique challenges.
Why Attic Insulation Matters for Pacific Northwest Homes
Before diving into the installation process, it’s important to understand why attic insulation, particularly R38, is a worthwhile investment:
- Energy Efficiency and Cost Reduction: Proper insulation prevents heat loss during colder months and keeps interiors cooler during summer, significantly reducing HVAC usage and utility bills. In the Pacific Northwest, where energy costs can be high, this can lead to substantial savings.
- Improved Indoor Air Quality: Insulation helps to minimize drafts and reduces the infiltration of allergens and pollutants, creating a healthier environment for you and your family.
- Structural Integrity: Attic boards and insulation add an extra layer of reinforcement to your roof, helping it withstand heavy snow loads and strong winds common in the region.
- Long-Term Property Value: Homes with well-maintained attics often have better resale values, as buyers are increasingly aware of the benefits of energy-efficient features.
Let’s explore how to install attic boards for R38 insulation and why this project makes a lasting difference.
sbb-itb-8db64ac
Step 1: Preparing Your Attic for Insulation
Measure and Plan
The video highlights the importance of precise measurements before installing attic boards. The boards need to create a gap that accommodates 12 inches of insulation for R38 rating. In this case, 2×6 boards (cut to 8 feet long) were used to provide this clearance.
Key Tips:
- Ensure the boards are properly aligned with your roof’s structure.
- Use a measuring tape and mark the areas where the boards will be installed.
Choose the Right Materials
For this project, the following materials and tools were used:
- 2×6 boards for structural support
- 2 1/2-inch screws with Torx heads for secure fastening
- A power drill for quick and sturdy installation
Step 2: Installing the Attic Boards
Strengthen Your Roof
The boards not only create room for insulation but also reinforce the roof’s structural capacity. This is particularly important in regions like the Pacific Northwest, where snow loads can be substantial. As the video explains, the added strength helps distribute weight and protect against roof damage.
Install with Precision
The process involves securing the boards to the roof frame with screws. While this step doesn’t require perfection, the boards should align closely to ensure even support for the insulation.
Pro Tip: Work methodically across one side of the attic at a time, moving items as needed to maintain a clear workspace.
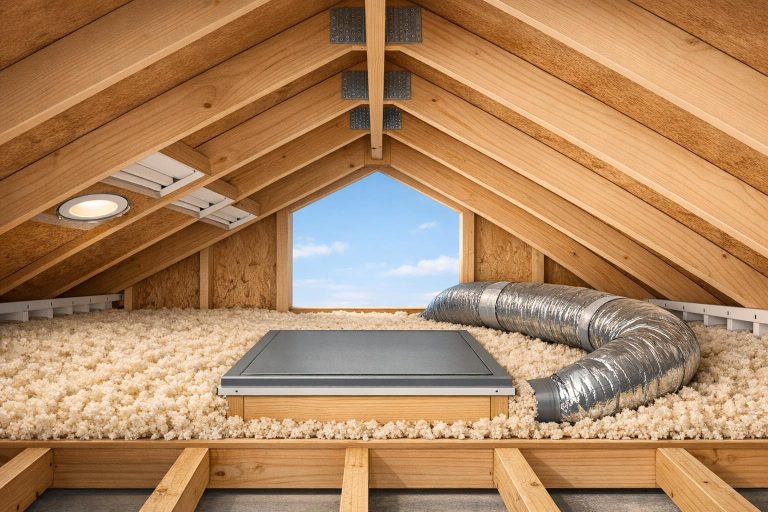
Step 3: Adding R38 Insulation
Start with the Right Insulation
R38 insulation is ideal for attics in colder climates, as it offers excellent thermal resistance. Begin by installing R19 insulation in vertical sections along exterior walls, then proceed to fill the upper cavities with R38.
Safety First
Working with insulation requires protective gear:
- Masks and goggles to protect your respiratory system and eyes from airborne fibers
- Gloves to prevent irritation from insulation material
Step 4: Ensuring Proper Ventilation
The video underscores the importance of maintaining ventilation to prevent moisture buildup, which can lead to mold and structural issues. Ventilation stops were placed to allow airflow while ensuring the insulation fits snugly.
Best Practice:
- Avoid over-compressing the insulation. Its effectiveness relies on its ability to trap air and create a thermal barrier.
The Rustic Rewards of DIY Home Improvement
While the video takes place in a remote, off-grid setting, the lessons resonate with Pacific Northwest homeowners who value hands-on contributions to their living space. As noted in the video, there’s a deep satisfaction in improving your home’s comfort and energy efficiency with your own efforts.
For those who prioritize professional-grade results, consider consulting licensed contractors who understand regional challenges like consistent rain, high humidity, and fluctuating temperatures. Comprehensive services that integrate insulation, ventilation, and structural repair can save time and provide peace of mind.
Key Takeaways
- Attic Insulation is Essential: Proper insulation – starting with R38 – reduces energy costs, improves air quality, and protects against structural damage.
- Plan and Measure Carefully: Ensure your attic boards are installed at the correct height to accommodate insulation thickness.
- Ventilation Matters: Prevent mold and moisture damage by maintaining airflow with ventilation stops.
- Protect Yourself: Always wear masks, goggles, and gloves when working with insulation to prioritize safety.
- Invest for the Long Term: Whether DIY or professionally installed, attic insulation enhances property value and sustainability.
R38 insulation is more than a material upgrade – it’s a commitment to your home’s efficiency, health, and longevity. For Pacific Northwest homeowners, prioritizing attic insulation is a smart move that pays dividends during every season. Whether you choose the DIY route or hire a trusted contractor, this project is a step toward a healthier, more sustainable home.
Source: "Back in the Attic: Installing Boards and Insulation" – Farming Up The Hill, YouTube, Jan 13, 2025 – https://www.youtube.com/watch?v=zo59RC0hEwo
Related Blog Posts
- Attic Insulation R-Value Calculator
- Best Practices for Attic Air Sealing
- R-Value Guide: Choosing the Right Insulation
- Radiant Barrier Installation Techniques: Expert Tips