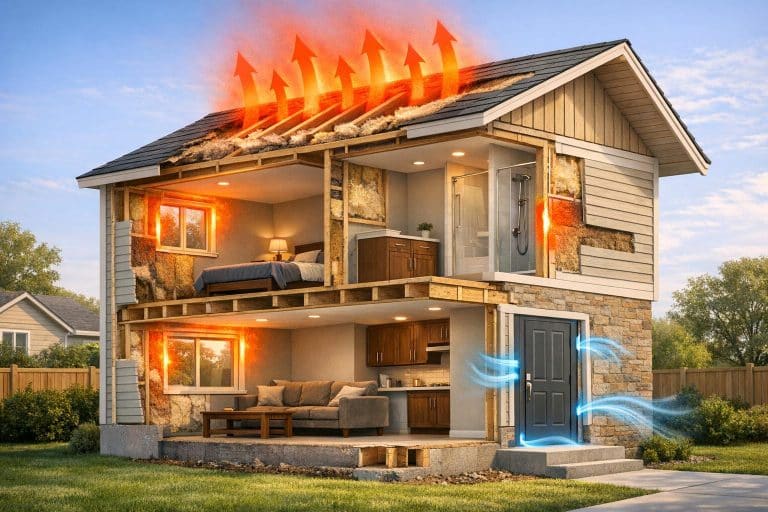
Crawl space encapsulation transforms a damp, moisture-prone area into a dry, controlled part of your home. This process improves air quality, lowers energy bills, and protects your home’s structure by sealing the space with a vapor barrier, insulation, and a dehumidifier. Here’s what you need to know:
- Why It Matters: Up to 60% of your home’s air comes from the crawl space. Without encapsulation, moisture can lead to mold, pests, and structural damage.
- Key Benefits:
- Energy Savings: Reduces heating and cooling costs by 15–20%.
- Healthier Air: Keeps humidity at 45–55%, preventing mold and allergens.
- Structural Protection: Prevents wood rot, pest infestations, and corrosion.
- Costs: Average projects range from $5,500 to $15,000, with potential savings on energy bills and increased home value.
- Maintenance: Regular inspections and dehumidifier upkeep can extend the system’s lifespan to 15–20 years.
Encapsulation requires careful preparation, including cleaning, sealing, and installing the right materials. While the upfront cost can be high, the long-term benefits for your home’s comfort, health, and durability make it a smart investment.
Crawl Space Encapsulation in 6 Steps | Vapor barrier, Dehumidifier, Cleaning & Repair
Benefits of Crawl Space Encapsulation
Transforming a damp crawl space into a sealed, conditioned area can have a positive impact on your entire home. From improving air quality to lowering energy bills, encapsulating this often-overlooked space delivers a range of advantages. Here’s how sealing and conditioning your crawl space can enhance your living environment.
Energy Efficiency and Lower Utility Bills
Encapsulation creates an insulating barrier that helps maintain consistent temperatures throughout your home. By sealing foundation vents, it reduces temperature fluctuations, keeping your floors warmer in winter and easing the workload on your HVAC system.
Research supports these benefits: Advanced Energy studies have shown that homes with conditioned crawl spaces can cut energy use by nearly 20%. Similarly, the U.S. Department of Energy notes that utility bills may drop by up to one-fifth after encapsulation. Additionally, sealing the crawl space protects HVAC ductwork from energy loss and moisture-related damage. On average, professional encapsulation costs around $15,000.
Better Indoor Air Quality
A significant portion of the air inside your home comes from the crawl space. If that space is damp and unsealed, it can introduce mold spores, allergens, and unpleasant odors into your living areas. Encapsulation addresses this issue by maintaining humidity levels between 45% and 55%, which inhibits mold growth and reduces allergens.
"A crawl space free of mold will lower indoor air pollution. High humidity affects mold and dust mite growth. Keeping dust mite colonies in check and minimizing mold growth will improve your air quality." – Michael, Founder, Crawl Space Ninja
Using a sealed vapor barrier and dehumidifier ensures that moisture levels stay under control, creating a healthier indoor environment.
Pest Prevention and Structural Protection
Dark, damp crawl spaces are magnets for pests like rodents, termites, and spiders. Encapsulation eliminates these inviting conditions by sealing off entry points and reducing humidity.
"Pests like insects and rodents thrive in moist, dark environments like crawl spaces and basements. Encapsulation seals these areas, making them less inviting." – JES Foundation Repair
The structural benefits are equally important. High humidity (over 60%) can lead to wood rot, weakening floor joists and subfloors over time. Encapsulation keeps the crawl space dry, preserving wood framing and protecting against termite damage. It also helps prevent corrosion of metal components like plumbing and wiring.
| Crawl Space Feature | Before Encapsulation | After Encapsulation |
|---|---|---|
| Humidity Levels | Often exceeds 60%; prone to condensation | Controlled at 45%–55% |
| Air Quality | Musty smells, mold spores, and allergens infiltrate the home | Cleaner air with reduced allergens and pollutants |
| Pest Activity | Attracts rodents, termites, and spiders | Deters pests by reducing moisture and sealing entries |
| Structural Health | Risk of wood rot and sagging floors | Dry environment protects wood framing and subfloors |
| Energy Usage | High utility bills due to air leaks and temperature swings | 15%–20% lower heating and cooling costs |
| Insulation | Damp, sagging, or falling fiberglass | Dry, effective rigid foam or spray foam |
How to Encapsulate a Crawl Space
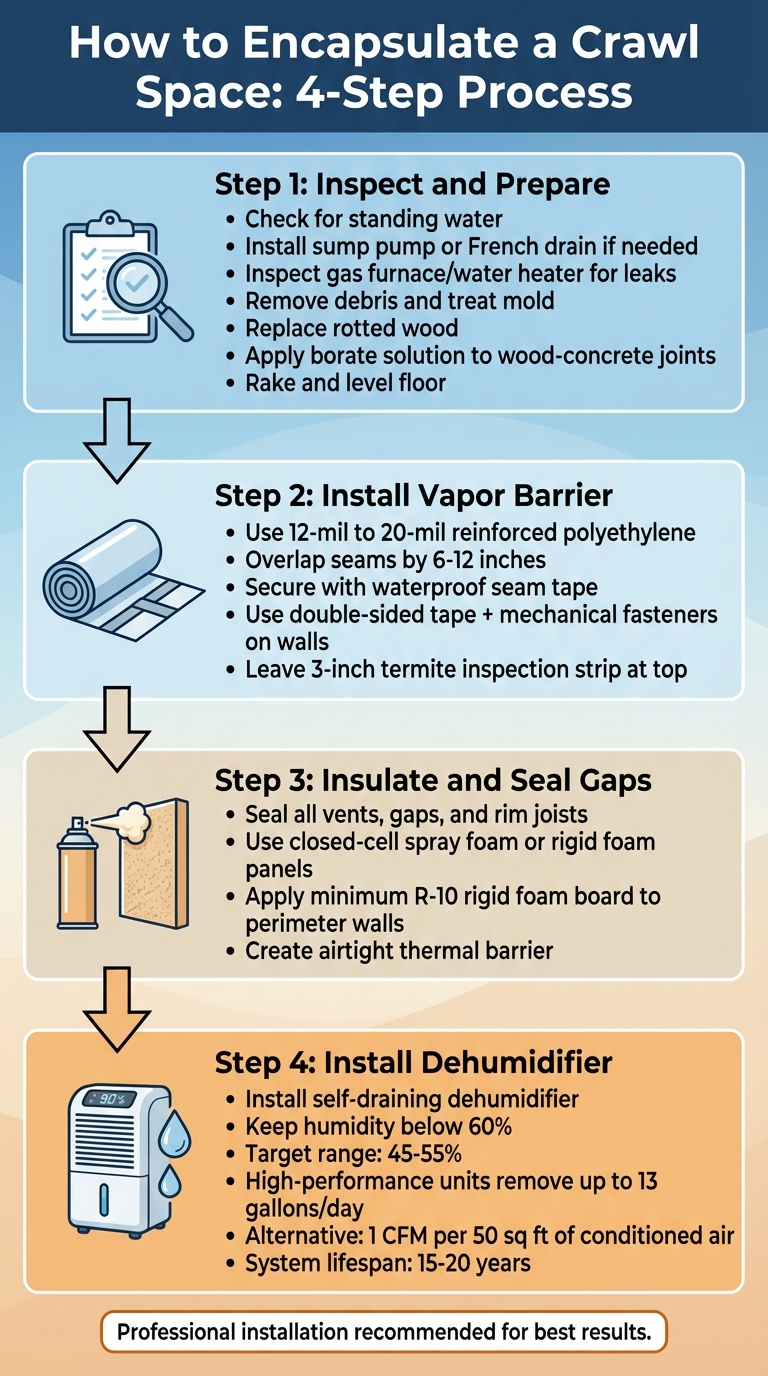
4-Step Crawl Space Encapsulation Process Guide
Encapsulating a crawl space requires careful preparation and execution to ensure proper sealing, drainage, and long-term effectiveness. Below, we’ll break down the process step by step, from initial inspection to ventilation.
Step 1: Inspect and Prepare the Crawl Space
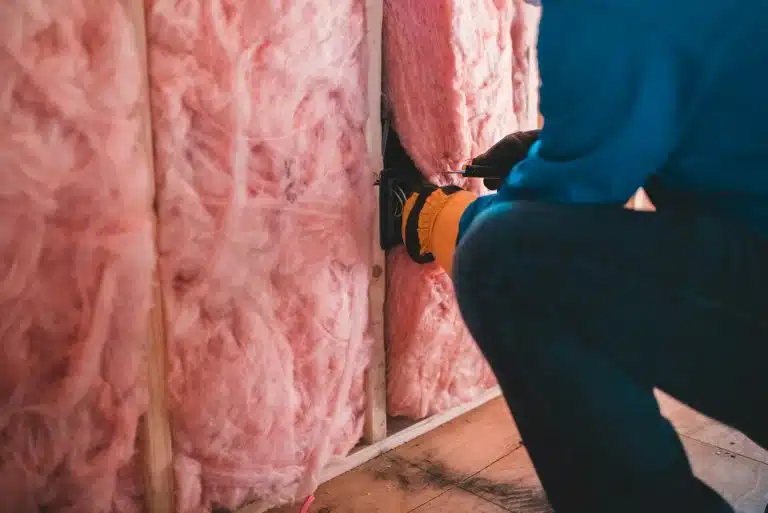
Before starting, give your crawl space a thorough inspection and cleaning – this step is crucial for achieving better energy efficiency and air quality. Start by checking for standing water and addressing drainage issues. You may need to install a sump pump or a French drain to prevent future water accumulation. If your gas furnace or water heater is located in the crawl space, inspect them for leaks, as sealing a crawl space with faulty combustion appliances can lead to dangerous carbon monoxide buildup inside your home.
Remove all debris and treat any mold with fungicides or hire a professional for remediation. Replace any rotted wood in the floor joists or subflooring, and apply a borate solution to areas where wood meets concrete – this helps protect against termites and wood decay. Finally, rake and level the floor to avoid puncturing the vapor barrier during installation.
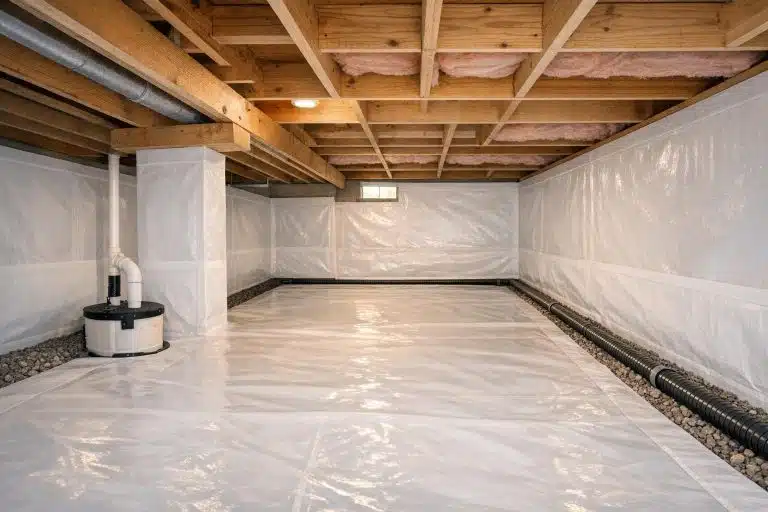
Step 2: Install a Vapor Barrier
The vapor barrier is the backbone of your encapsulation system. Professional-grade barriers are typically made from 12-mil to 20-mil reinforced polyethylene, designed to block moisture from seeping through the soil and foundation walls.
Cover the entire floor with the barrier, overlapping seams by 6–12 inches, and secure them with waterproof seam tape. For the walls, use double-sided construction tape along with mechanical fasteners, such as termination bars or masonry screws, to ensure the barrier stays in place over time. Adhesive tape alone isn’t reliable enough, as it may loosen due to weight and moisture. Additionally, leave a 3-inch termite inspection strip of exposed concrete at the top of the foundation walls. This complies with building codes and allows pest inspectors to do their job effectively.
Step 3: Insulate and Seal Gaps
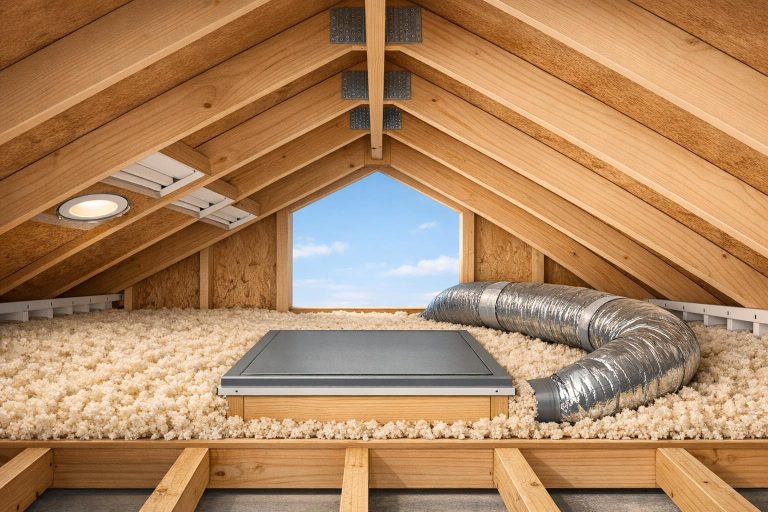
Once the vapor barrier is in place, focus on sealing all vents, gaps, and rim joists. Use closed-cell spray foam or rigid foam panels to create a tight seal. For insulation, apply a minimum of R-10 rigid foam board to the perimeter walls. This step creates an airtight thermal barrier that helps regulate temperatures in your crawl space and home throughout the year.
Step 4: Install a Dehumidifier and Ensure Ventilation
To maintain the ideal humidity level, install a self-draining dehumidifier. This prevents mold growth and wood rot by keeping humidity in check. According to the U.S. Department of Energy:
"Keeping humidity below 60 percent is key to mold prevention and long-term performance."
High-performance dehumidifiers can remove up to 13 gallons of moisture per day. Alternatively, if you’re integrating your HVAC system, the EPA suggests supplying one cubic foot per minute (CFM) of conditioned air for every 50 square feet of crawl space. With proper installation and regular upkeep, a well-encapsulated crawl space can last 15 to 20 years.
sbb-itb-8db64ac
Materials, Tools, and Costs
Having the right materials and tools is key to ensuring that crawl space encapsulation provides long-term energy efficiency and structural protection.
Required Materials and Tools
Choosing the right materials is crucial for a successful encapsulation. For vapor barriers, heavy-duty polyethylene sheets between 12 and 20 mils thick are recommended. While 6-mil barriers meet basic code requirements, they’re less durable and prone to tearing. For insulation, rigid foam boards like XPS or polyisocyanurate, or closed-cell spray foam, work well on foundation walls and rim joists to create an effective thermal break.
Your toolkit should include waterproof seam tape, double-sided construction tape, spray foam sealant, and mechanical fasteners such as termination bars or masonry screws. A gas-actuated fastener gun, like a Hilti, can make securing the barrier to walls much easier. Additionally, moisture management tools are essential – a crawl space-specific dehumidifier is a must, and if standing water is present, you’ll need a sump pump with a basin and possibly a French drain system.
| Vapor Barrier Thickness | Cost per Sq. Ft. | Best Use Case |
|---|---|---|
| 6 mil | $0.05–$0.20 | Basic code compliance; tears easily |
| 10–12 mil | $0.25–$0.40 | Standard durability for most homes |
| 20 mil | $0.40–$0.60 | High durability for storage or heavy-use areas |
Understanding these materials helps you make informed decisions about costs and performance.
Cost Factors and Return on Investment
The total cost of encapsulation depends on material quality, labor, and project complexity. On average, encapsulation projects cost around $5,500 but can range from $1,500 to $15,000. For basic projects, expect costs between $3 and $7 per square foot. However, addressing significant moisture issues can push costs up to $10 per square foot. Labor typically accounts for 50%–70% of the total expense. Ryan Norman, Owner of Norman Builders, highlights the high cost of durable materials:
"The costliest aspects of encapsulating a crawl space are usually securing the area and installing heavy duty vapor barriers or liners."
Certain factors can increase costs. Crawl spaces under 3 feet tall are harder to work in, leading to higher labor costs. Similarly, irregular stone foundations are more expensive to encapsulate than smooth concrete block foundations. Pre-existing issues like mold remediation ($500–$4,000) or structural repairs ($2,000–$7,000) also add to the project’s cost.
Despite the upfront investment, encapsulation often pays off. Homeowners typically save 15%–20% on annual heating and cooling bills. Additionally, encapsulation can increase a home’s resale value by about 10%. For every $1 saved annually on energy costs, a home’s value can rise by $20–$24. Effective encapsulation also prevents costly foundation repairs, which can save $5,000 to $25,000 over time. With proper maintenance, an encapsulation system can last 15 to 20 years, making it a worthwhile long-term investment.
Maintaining Your Encapsulated Crawl Space
Taking care of your encapsulated crawl space isn’t just about keeping it clean – it’s about extending its lifespan and avoiding expensive repairs. With regular upkeep, encapsulation systems can last anywhere from 15 to 20 years, and high-quality vapor barriers can stay effective for up to 25 years.
Keeping an eye on humidity levels is crucial. Aim for a range of 45% to 55% to prevent mold and maintain good indoor air quality. To stay ahead of potential problems, plan for annual inspections. These checkups can catch small issues before they snowball into costly repairs.
Annual Inspections and Repairs
At least once a year, bring in a professional to inspect your crawl space. During these inspections, technicians will examine the vapor barrier for any tears, gaps, or punctures. They’ll also ensure that seam tape is still securely in place and that the barrier hasn’t shifted or detached from the walls.
Dehumidifier maintenance is another key step. Cleaning filters and clearing condensate lines regularly ensures the dehumidifier runs efficiently, removing up to 13 gallons of moisture daily. Neglecting these tasks could lead to clogs or mechanical failures. Sump pumps also need testing – adding water to the system can confirm that both the main pump and battery backup are functioning properly, and that discharge lines are clear.
Inspections don’t stop there. They should also cover signs of pest activity, sagging insulation, foundation cracks, and standing water. As Acculevel points out:
"It is always easier (and less expensive) to fix small problems in the beginning stages".
Addressing these minor issues early can save you from bigger headaches – and bigger bills – later on.
Envirosmart Solution‘s Maintenance Plans
![]()
Envirosmart Solution makes crawl space care hassle-free with their CRAWL SPACE & ATTIC CARE™ plan. For $199 annually, this plan includes rodent inspections, insulation checks, and air gap assessments. Plus, you’ll get a 15% discount on any additional services recommended during the inspection, making it easier to handle problems before they grow.
For a more all-encompassing option, consider their SMART GOLD™ package. At $699 per year, it combines crawl space and attic care with furnace maintenance, air duct cleaning, and dryer vent service. This plan also includes a 20% discount on extra services, ensuring that all the critical systems in your home get professional attention year-round.
Conclusion
Crawl space encapsulation turns an often-overlooked area of your home into an energy-saving powerhouse. By sealing out moisture, keeping pests at bay, and creating a controlled environment, you’re not only safeguarding your home’s structure but also cutting energy costs by an impressive 15% to 20%. Plus, with up to 60% of the air in your home coming from the crawl space, improving the air quality below can lead to a healthier living space above.
The process involves several steps: inspection, installing a durable vapor barrier, sealing gaps, adding insulation, and managing humidity with a professional-grade dehumidifier. While it requires an upfront investment, the long-term benefits – like enhanced comfort and a potential boost in home value of up to 10% – make it a smart choice for homeowners.
Professional installation ensures the use of high-quality, code-compliant materials and addresses any underlying issues. A well-installed encapsulation system can last 15 to 20 years or longer, but regular maintenance is key. Annual inspections help catch minor problems before they turn into expensive repairs, ensuring your system operates efficiently for years to come.
Envirosmart Solution offers maintenance plans designed to simplify ongoing care. With professional inspections and service discounts, they help keep your crawl space in top condition. By staying proactive with installation and maintenance, you can enjoy the benefits of encapsulation for decades.
Don’t wait for moisture problems, mold, or rising energy bills to take action. A dry, sealed crawl space not only protects your home but also creates a healthier environment for your family. It’s an investment in comfort, health, and peace of mind.
FAQs
What are the long-term benefits of encapsulating a crawl space?
Encapsulating your crawl space can bring long-term advantages that boost your home’s overall comfort, air quality, and even its market value. By sealing the area with a vapor barrier, adding insulation, and using a dehumidifier, you can effectively control moisture levels. This prevents problems like mold, mildew, wood rot, and pest issues, all of which can compromise your home’s foundation and structural strength. Taking these steps now can save you from expensive repairs down the line.
Keeping your crawl space dry also improves the quality of the air inside your home and helps your HVAC system run more efficiently. This can lead to noticeable savings on heating and cooling bills. On top of that, a sealed crawl space is a sought-after feature for homebuyers, making your property more appealing if you ever decide to sell. Encapsulation not only protects your home but also lowers energy costs and supports a healthier living environment.
How does crawl space encapsulation help improve the air quality in my home?
Crawl space encapsulation plays a big role in improving indoor air quality by tackling excess moisture – one of the main culprits behind mold, mildew, and pest problems. The process involves installing a vapor barrier, sealing vents, and using a dehumidifier to keep humidity levels between 30–50%. This keeps the crawl space dry and discourages mold and bacteria from growing. It also minimizes the flow of humid outdoor air into your home, cutting down on allergens and mold spores that could otherwise circulate in your living spaces.
Since as much as 60% of the air inside your home can originate from the crawl space, maintaining a clean, dry area has a direct impact on the air you breathe. Encapsulation helps protect wood framing, insulation, and ducts from mold growth, reducing odors, allergens, and other irritants that might affect your respiratory health. Many homeowners report their homes smelling fresher and experiencing more stable indoor humidity after encapsulation, leading to a healthier and more comfortable environment overall.
What determines the cost of crawl space encapsulation?
The cost of crawl space encapsulation can vary widely based on a few key factors that are specific to your home and its location. One of the biggest considerations is the size of the crawl space – a larger space means more materials and labor, which naturally increases the cost. Additionally, the current condition of the crawl space is crucial. Problems like standing water, mold, or structural damage might require extra steps, such as waterproofing, mold removal, or repairs, before the encapsulation process can even begin.
Other cost factors include the vapor barrier type and thickness – for example, a 6-mil polyethylene barrier will typically cost less than a thicker 12-mil option. The type of insulation you choose also matters, whether it’s spray foam, foam board, or fiberglass batts. If your project includes installing extra equipment like a dehumidifier or a vent-sealing system, that will add to the final price as well. Labor costs can fluctuate depending on how easy it is to access the crawl space – tight or cramped areas often require more effort – and regional labor rates. Don’t forget about permits and potential upgrades needed to comply with local building codes, which can also affect the total cost.
On average, homeowners in the U.S. spend between $5,000 and $15,000 on crawl space encapsulation, but the final price depends on the specific details of your project.